Plant Guide
-
-
-

-
July 02,2026
-
Detailed Planting Steps for Quercus palustris in a Home Garden!
-
If you’re looking to add a stunning, long-lived shade tree to your home garden, Quercus palustris, commonly known as pin oak, is one of the best choices you can make. Famous for its unique tiered branch structure, glossy deep-green foliage, and vivid scarlet autumn leaves, this native deciduous tree brings layered beauty to residential landscapes year-round. Unlike many finicky ornamental trees, pin oak is tough, adaptable, and tolerant of urban environments, wet soil, and mild pollution, making it perfect for backyard gardens, front-yard landscaping, and open lawn spaces. However, many home gardeners struggle with stunted growth, yellowing leaves, or weak canopy development simply because they skip key planting steps. Proper planting is the foundation of a healthy pin oak that can thrive for over a century. This step-by-step guide will walk you through every detailed, beginner-friendly planting process for Quercus palustris in a home garden, from site selection to post-planting maintenance.Before diving into specific planting steps, it’s essential to understand the core growth habits of pin oak to avoid common mistakes. Unlike most oak trees that prefer dry, elevated ground, Quercus palustris naturally grows in swampy lowlands and moist floodplain areas. It loves consistent soil moisture but hates waterlogged, airless root environments. Its most common growth issue in home gardens is iron chlorosis, a yellow leaf condition caused by alkaline soil, which many new gardeners fail to prevent during planting. Additionally, pin oak develops a distinct layered branch shape with upward upper limbs, horizontal middle branches, and drooping lower branches, requiring ample open space to grow naturally without pruning damage. With targeted pre-plant preparation and standardized planting operations, you can easily help your pin oak take root steadily and grow vigorously year after year.Step 1: Careful Site Selection and Space Planning (The Most Overlooked Key Step)Site selection is the foundation of successful pin oak planting, and rushing this step is the number one mistake new gardeners make. First and foremost, pin oaks require full, unobstructed sunlight to thrive. This tree needs a minimum of six to eight hours of direct natural sunlight every day throughout the growing season. Partial shade or long-term dappled sunlight under taller trees, beside houses, or near tall fences will lead to a host of problems: thin, leggy branch growth, sparse leaf coverage, dull autumn color, and drastically reduced disease resistance. Even young saplings will struggle to establish themselves in shaded spots, so always choose an open, exposed lawn area with zero overhead blockage for your planting site.Equally important is long-term space planning. It’s easy to underestimate how large a mature pin oak can grow. Fully grown Quercus palustris trees reach heights of 70 to 80 feet, with a wide, spreading canopy that can span 40 to 60 feet across. For residential gardens, you must reserve plenty of room to avoid future conflicts. Keep your planting spot at least 25 to 30 feet away from your home’s foundation, outdoor patios, driveways, underground utility lines, and boundary fences. Planting too close will lead to crowded root systems, restricted canopy growth, and even structural damage to your property as the tree matures. Additionally, avoid low-lying depressions in your yard that collect standing water after rain or irrigation. While pin oaks tolerate moist soil better than most oaks, persistent stagnant water will suffocate young feeder roots and trigger fatal root rot. A flat or slightly elevated open garden plot with natural drainage is absolutely ideal for long-term healthy growth.Step 2: Soil Testing and Targeted Pre-Plant Soil ImprovementSoil quality and pH balance make or break pin oak growth, and this is where most home gardeners go wrong. Quercus palustris has strict soil preferences: it demands acidic soil with a pH range of 4.5 to 6.5. Alkaline soil is the biggest threat to pin oaks in residential landscapes. Most backyard garden soil is neutral or slightly alkaline due to lawn fertilizers, concrete runoff, and naturally high mineral content. In alkaline conditions, iron and other key nutrients become locked in the soil, impossible for the tree’s roots to absorb. The result is iron chlorosis, a condition that turns leaves pale yellow, stunts new growth, and causes gradual branch dieback over multiple growing seasons.Before digging any holes, invest in an affordable home soil test kit to check your garden’s pH level and nutrient composition. If your soil tests above 6.5 pH, you’ll need to amend it to lower alkalinity and boost acidity naturally. The best organic amendments for pin oaks are aged pine bark mulch, decomposed oak leaf humus, peat moss, and well-rotted forest compost. These materials gradually acidify the soil over time, improve soil structure, and add organic nutrients without shocking young roots. Never mix lime, alkaline garden fertilizer, or fresh uncomposted manure into your planting soil—these will raise pH levels and cause immediate growth issues.Pin oaks adapt well to loamy, sandy-loam, and lightly clay soil, but heavy compacted clay soil common in suburban yards requires extra treatment. Compacted soil traps water, blocks airflow, and restricts root expansion. To fix this, mix coarse horticultural sand and organic compost into the native soil to loosen dense texture, improve drainage, and create a loose, breathable growing medium for new roots. Well-amended acidic, loose, consistently moist soil gives your pin oak sapling the perfect environment to establish strong, wide-spreading roots in its critical first year of growth.Step 3: Digging the Perfect Planting Hole (Wide and Shallow, Not Deep and Narrow)A common beginner misconception is that deeper holes equal better tree growth. For Quercus palustris, this could not be more incorrect. Pin oak roots grow wide and shallow, spreading horizontally just below the soil surface to absorb moisture and nutrients. Deep, narrow planting holes force roots downward, restricting their natural expansion and leaving the tree unstable and prone to drought stress. The golden rule for pin oak planting holes is wide and shallow.Your finished planting hole should be two to three times wider than the sapling’s entire root ball, with a depth that exactly matches the height of the root ball. This gives new roots plenty of loose soil to spread outward quickly and anchor the tree firmly. When digging, separate topsoil and subsoil intentionally. The dark, nutrient-rich topsoil from the upper 8 to 12 inches of ground is perfect for backfilling, while the harder, less fertile subsoil can be discarded or mixed with extra compost for future garden use.Smooth out the rough walls and flat bottom of the hole with a garden rake to eliminate hard soil clods. Hard, compacted hole walls act as a barrier, trapping roots and preventing outward growth. For yards with poor drainage, dig three to four small auxiliary drainage trenches around the base of the planting hole before backfilling. These small trenches allow excess rainwater to seep away quickly, eliminating the risk of root rot during heavy rainy seasons without drying out the soil completely.Step 4: Sapling Preparation and Precise PlacementMost home gardeners purchase container-grown or ball-and-burlap pin oak saplings from local nurseries, and both types require gentle pre-plant preparation. For container saplings, carefully remove the plastic nursery pot, taking care not to tear or damage the root ball. Many nursery-grown saplings develop circling roots that wrap tightly around the root ball. Gently loosen these bound roots with your fingers or a small garden fork to break the circular growth pattern. This simple step encourages roots to spread outward into the native garden soil instead of continuing to grow inward and strangle the tree over time.For ball-and-burlap saplings, remove all twine, wire, and synthetic burlap wrapping completely before planting. These materials do not decompose quickly underground and will constrict root growth, cut off nutrient flow, and weaken the tree long-term. Once your sapling is prepped, set it perfectly in the center of the planting hole. The most critical detail here is aligning the root flare—the swollen junction where trunk meets roots—exactly level with the garden soil surface.Buried root flares are the leading cause of mature pin oak decline in home gardens. Even a few inches of excess soil covering the root flare will trap moisture, cause trunk rot, invite pests and fungal disease, and slowly kill the tree over years. Take your time to adjust the sapling’s height and ensure it stands perfectly straight and vertical. Once positioned correctly, begin backfilling in thin, even layers of topsoil. After each layer, gently tamp the soil down with your hand or a small tool to eliminate air pockets. Unfilled air pockets cause roots to dry out, create unstable growth, and lead to sapling leaning or tipping in wind and rain.Step 5: Initial Watering, Soil Settling, and Protective MulchingProper post-planting watering is what seals in all your pre-plant preparation work and helps the sapling recover from transplant shock. Immediately after finishing backfilling, administer a deep, slow saturation watering. Avoid fast, forceful sprays that wash away topsoil or expose young roots. Water slowly and evenly across the entire planting zone until the soil is completely saturated several inches deep. This initial watering merges the root ball with the surrounding garden soil, eliminates leftover air gaps, and hydrates every new root fiber.In the first full growing season, consistent moisture is non-negotiable for young pin oaks. Water deeply once every five to seven days during dry, hot weather, maintaining steady mild soil moisture. Let the top inch of soil dry slightly between waterings to avoid over-saturation. Established mature pin oaks handle short droughts well, but newly planted saplings have fragile, underdeveloped root systems and cannot tolerate dry conditions.Once the initial water fully settles into the soil, apply a protective mulch layer. Use organic acidic mulch materials including pine wood chips, shredded pine bark, or decomposed oak leaves. Spread a 2 to 3-inch thick layer evenly across the entire root zone, extending a few inches past the edge of the planting hole. Mulch serves multiple essential purposes: it locks in soil moisture, regulates soil temperature in hot summers and cold winters, suppresses weed growth that competes for nutrients, and slowly decomposes to maintain acidic soil pH over time. Always leave a 2-inch gap between the mulch and the tree trunk. Piling mulch directly against the bark causes rot, harbors harmful insects, and promotes fungal infections that damage young trees.Step 6: Early Pruning, Fertilization, and Seasonal MaintenanceNewly planted pin oak saplings need minimal pruning in their first year of growth. Heavy early pruning drains stored tree energy, slows root establishment, and weakens young saplings. Your only pruning task for the first 12 months is removing dead, broken, diseased, or crossing small branches. This cleans up the tree’s structure and prevents disease spread without disrupting healthy growth. Any major shaping or structural pruning should wait until the tree enters full winter dormancy, after all leaves have dropped. Pruning during the growing season causes sap loss and increases the risk of fatal oak wilt infection.Fertilization is another area where less is more for new pin oaks. Never apply fertilizer within six months of planting. Freshly disturbed roots are extremely tender and easily burned by synthetic fertilizers, which can kill a healthy sapling quickly. After six months, if new spring growth appears pale or slow, apply a mild, slow-release acidic tree fertilizer designed for oak and azalea species. Use a light dosage only—over-fertilization produces soft, weak new growth that attracts pests and fails to harden off before winter frost.Throughout the first two years, make routine checks on your pin oak’s condition. Monitor soil moisture after heavy rain to ensure no standing water accumulates around the root zone. Refresh mulch annually to maintain thickness and preserve soil acidity. Check for common early issues like yellowing leaves, aphids, or leaf spot fungus, and address minor problems immediately before they escalate. As your sapling matures, it will gradually develop its iconic tiered canopy, require less frequent watering, and become increasingly low-maintenance.Final ThoughtsPlanting Quercus palustris in a home garden is not a complicated task, but it demands patience, attention to detail, and respect for the tree’s unique natural growth habits. Unlike generic landscape trees, pin oaks thrive when their specific needs for acidic soil, full sunlight, consistent moisture, and uncramped growing space are met. Skipping soil testing, planting too deep, neglecting mulch, or over-pruning are small mistakes that lead to big problems years down the line. By following this complete step-by-step planting process, you give your pin oak the strongest possible start. With minimal ongoing care, it will grow steadily each year, providing lush summer shade, breathtaking fall color, and timeless landscape beauty for generations. For any homeowner looking to invest in a permanent, high-value tree for their garden, the pin oak is an unbeatable choice when planted correctly.
-
-
May 06,2026
-
How should I care for Common asparagus fern?
-
The Common asparagus fern (Asparagus setaceus), also known as lace fern or asparagus grass, is a beloved houseplant and outdoor ornamental celebrated for its delicate, feathery foliage and easygoing nature. Despite its name, it is not a true fern—instead, it belongs to the Asparagaceae family, closely related to edible asparagus. Native to South Africa, this versatile plant thrives in both indoor and outdoor settings (in suitable climates), adding a touch of softness and greenery to any space. Whether you’re a beginner gardener or a seasoned plant parent, mastering the care of Common asparagus fern is straightforward once you understand its specific needs. One of the reasons the Common asparagus fern is so popular is its adaptability. Indoors, it grows well in hanging baskets, on shelves, or as a tabletop plant, where its cascading fronds can trail beautifully. Outdoors, it thrives in shaded or partially shaded gardens, borders, or as ground cover in warm climates (USDA zones 9–11). While it is relatively low-maintenance, it does have specific requirements for light, water, and humidity to avoid common problems like yellowing fronds, root rot, or pest infestations.1. Light Requirements: Finding the Perfect SpotLight is one of the most critical factors in caring for Common asparagus fern, as it directly impacts its growth, foliage color, and overall health. In its native habitat, asparagus fern grows under the canopy of larger plants, receiving dappled, indirect sunlight. This means it prefers bright, indirect light when grown indoors or outdoors—direct sunlight can be harmful, while too little light will cause leggy growth and faded foliage.Indoors, the ideal spot for your asparagus fern is near a window that receives bright, filtered light. East or west-facing windows are perfect, as they provide gentle morning or afternoon light without the harsh midday sun. If you have a south-facing window, place the plant a few feet back from the glass or use a sheer curtain to filter the light, as direct sunlight can scorch the delicate fronds, causing brown, crispy tips or yellowing leaves. North-facing windows may not provide enough light, leading to sparse growth and pale foliage—if this is your only option, consider supplementing with a grow light set to 12–14 hours per day. Outdoors, asparagus fern thrives in partial shade or dappled sunlight; avoid planting it in full sun, especially in hot climates, as this will damage the foliage. In cooler regions, it can tolerate a few hours of morning sun, but afternoon shade is essential.2. Watering: Balancing Moisture and DrainageCommon asparagus fern prefers consistently moist soil, but it is highly susceptible to root rot if overwatered. Finding the right balance between keeping the soil moist and avoiding waterlogging is key to its health. The plant’s water needs vary depending on factors like light, temperature, humidity, and the size of the pot, so it’s important to check the soil regularly rather than following a strict schedule.To water your asparagus fern correctly, stick your finger 1–2 inches into the soil. If the top inch of soil feels dry, it’s time to water. Water thoroughly until the water drains out of the bottom of the pot, then empty the saucer to prevent the roots from sitting in standing water—this is crucial, as stagnant water will cause root rot. During the growing season (spring and summer), when the plant is actively growing, you may need to water every 2–3 days, depending on the conditions. In fall and winter, when growth slows down, reduce watering to once a week or less, allowing the soil to dry out slightly more between waterings. Avoid using cold water, as this can shock the roots; room-temperature water is best. Additionally, if your tap water is hard (high in minerals), consider using filtered or distilled water, as mineral buildup can damage the plant over time.3. Soil and Potting: Creating the Ideal Growing MediumCommon asparagus fern thrives in well-draining, nutrient-rich soil that is slightly acidic to neutral (pH 6.0–7.0). The soil should retain moisture without becoming waterlogged, as the plant’s roots need both water and oxygen to thrive. A poor-quality or heavy soil will lead to root rot, so it’s important to choose the right potting mix or create your own.For indoor plants, a high-quality potting mix designed for ferns or tropical plants works well. You can also create a custom mix by combining equal parts peat moss (or coco coir), perlite, and potting soil. Peat moss or coco coir retains moisture, while perlite improves drainage, preventing waterlogging. Adding a small amount of compost or worm castings will provide essential nutrients to support healthy growth. When potting, choose a pot with drainage holes at the bottom to ensure excess water can escape. The pot should be slightly larger than the plant’s root ball—too large a pot will hold too much moisture, increasing the risk of root rot. Repot your asparagus fern every 1–2 years, or when you notice the roots growing out of the drainage holes, using fresh potting mix to replenish nutrients.4. Temperature and Humidity: Mimicking Its Native HabitatAs a tropical plant native to South Africa, Common asparagus fern prefers warm temperatures and high humidity. It is not frost-tolerant, so it’s important to protect it from cold temperatures, especially if you’re growing it outdoors. Understanding its temperature and humidity needs will help you keep your plant healthy year-round.The ideal temperature range for Common asparagus fern is 60–75°F (15–24°C). It can tolerate temperatures as low as 50°F (10°C) for short periods, but prolonged exposure to temperatures below 50°F will cause yellowing fronds and stunted growth. Frost will kill the plant, so if you live in a climate with cold winters (USDA zones below 9), grow your asparagus fern indoors or bring it indoors before the first frost. In summer, avoid placing the plant near air conditioning vents or drafty windows, as sudden temperature changes can stress the plant. Humidity is equally important—aspagus fern thrives in humidity levels of 50–70%. Indoors, dry air (especially duringwinter) can cause the fronds to turn brown and crispy. To increase humidity, you can mist the plant regularly with room-temperature water, place a tray of water and pebbles near the plant (the water will evaporate, adding moisture to the air), or use a humidifier. Grouping plants together can also help create a more humid microclimate.5. Fertilizing: Feeding for Healthy GrowthCommon asparagus fern benefits from regular fertilization during the growing season to support its lush foliage and active growth. However, it is not a heavy feeder, so over-fertilizing can cause fertilizer burn, leading to brown tips and leaf drop. Choosing the right fertilizer and following a consistent schedule will ensure your plant gets the nutrients it needs without harm.During the growing season (spring and summer), fertilize your asparagus fern every 2–4 weeks with a balanced, water-soluble fertilizer (such as 10-10-10 or 20-20-20) diluted to half strength. This will provide a steady supply of nitrogen, phosphorus, and potassium, which are essential for healthy foliage and root growth. Avoid fertilizing in fall and winter, when the plant is dormant—feeding during this time can stress the plant and lead to nutrient buildup in the soil. If you notice yellowing fronds or slow growth, this may be a sign of under-fertilization, but always check the soil moisture first, as overwatering can cause similar symptoms. Additionally, every 6 months, you can add a small amount of compost or worm castings to the top of the soil to replenish organic nutrients.6. Pruning: Maintaining Shape and HealthPruning is an important part of Common asparagus fern care, as it helps maintain the plant’s shape, remove dead or damaged foliage, and promote new growth. The plant can become leggy over time, with long, sparse stems and faded fronds, so regular pruning will keep it looking lush and compact.To prune your asparagus fern, use clean, sharp pruning shears or scissors. Remove any yellow, brown, or dead fronds at the base of the stem—this will redirect the plant’s energy to healthy growth. You can also trim back leggy stems to encourage bushier growth; cut the stems just above a node (the point where a leaf or frond attaches to the stem). Pruning can be done at any time of year, but it’s most effective during the growing season (spring and summer), when the plant is actively producing new growth. Avoid over-pruning, as this can stress the plant—never remove more than one-third of the foliage at once. After pruning, dispose of the cuttings properly, as they can be toxic to pets if ingested.7. Propagation: Growing New PlantsIf you want to expand your collection of Common asparagus fern or share it with friends, propagation is a simple and cost-effective method. The plant can be propagated by division or from seeds, with division being the easiest and most reliable method for beginners.Propagation by division is best done in spring, when the plant is actively growing. Carefully remove the plant from its pot and gently separate the root ball into two or more sections, ensuring each section has a healthy cluster of roots and fronds. Use your hands or a sharp knife to divide the root ball—be careful not to damage the roots. Plant each division in a new pot with fresh potting mix, water thoroughly, and place in a bright, indirect light. Keep the soil moist but not waterlogged until the new plants become established (usually 2–4 weeks). Propagation from seeds is more time-consuming: collect seeds from the plant’s berries (which turn red when ripe), remove the pulp, and plant them in a pot with moist potting mix. Cover the pot with plastic wrap to retain moisture, place in a warm, bright spot, and keep the soil moist. Germination can take 2–4 weeks, and the new plants will take several months to mature.8. Pest and Disease Control: Troubleshooting Common IssuesCommon asparagus fern is relatively resistant to pests and diseases, but it can still be affected by a few common problems. Early detection and treatment are key to preventing serious damage, so it’s important to inspect your plant regularly for signs of trouble.The most common pests that affect asparagus fern are spider mites, mealybugs, and aphids. Spider mites are tiny, red or brown pests that thrive in dry conditions, causing yellow spots and webbing on the fronds. Mealybugs appear as white, cottony masses on the stems and undersides of leaves, while aphids are small, green or black insects that suck sap from the plant. To treat these pests, wipe the fronds with a damp cloth to remove the insects, then spray the plant with a solution of water and mild dish soap (1 teaspoon per quart of water) or neem oil. For severe infestations, use an insecticidal soap or horticultural oil, following the instructions on the label. The most common disease is root rot, caused by overwatering or poor drainage. Signs of root rot include yellowing fronds, mushy roots, and a foul odor. If you suspect root rot, remove the plant from its pot, trim away any rotted roots, and repot in fresh, well-draining soil. Reduce watering and ensure the pot has proper drainage to prevent recurrence.9. Outdoor Care: Growing Common Asparagus Fern in GardensIn warm climates (USDA zones 9–11), Common asparagus fern can be grown outdoors year-round as a ground cover, border plant, or in hanging baskets. It thrives in partial shade or dappled sunlight, making it ideal for gardens with filtered light (such as under trees or near tall shrubs).When planting outdoors, choose a spot with well-draining soil and amend it with compost or peat moss to improve moisture retention and drainage. Space plants 12–18 inches apart to allow for growth, as asparagus fern can spread quickly. Water regularly during the first few weeks to help the plant establish roots, then reduce watering once established (it is drought-tolerant once rooted). Fertilize once in spring with a balanced, slow-release fertilizer to support growth. In cooler regions, you can grow asparagus fern outdoors as an annual, planting it in spring and removing it before the first frost. Alternatively, dig up the plant and pot it indoors for the winter, placing it in a bright, cool spot (50–60°F) and reducing watering.10. Toxicity: Keeping Pets and Children SafeIt’s important to note that Common asparagus fern is toxic to cats, dogs, and humans if ingested. The plant contains sapogenins, which can cause vomiting, diarrhea, and abdominal pain in pets, and mouth irritation, nausea, and vomiting in humans. The berries are particularly toxic, so it’s important to keep the plant out of reach of pets and small children.If you have pets, place your asparagus fern in a location they cannot access (such as a high shelf or hanging basket). If you suspect your pet has ingested any part of the plant, contact your veterinarian immediately. For humans, wash your hands thoroughly after handling the plant, especially if you have cuts or scrapes on your hands, as the sap can cause skin irritation in some people.Conclusion: Enjoying Your Lush, Healthy Common Asparagus FernCaring for Common asparagus fern is a rewarding experience, as this beautiful plant adds a touch of elegance and greenery to any space. By following the guidelines in this article—providing bright, indirect light, consistent moisture, well-draining soil, warm temperatures, and regular care—you can keep your asparagus fern healthy and vibrant for years to come. Whether you’re growing it indoors as a houseplant or outdoors in a garden, its delicate fronds and easygoing nature make it a perfect choice for both beginner and experienced gardeners.Remember to check your plant regularly for signs of stress, pests, or disease, and adjust your care routine as needed. With a little attention and care, your Common asparagus fern will thrive, bringing joy and beauty to your home or garden. Whether you’re looking to add a trailing plant to your hanging basket, a lush ground cover to your garden, or a simple tabletop plant to your home, the Common asparagus fern is a versatile and stunning choice that is sure to impress.
-
-
January 23,2026
-
Growth Characteristics and Traditional Uses of Colocasia esculenta
-
Colocasia esculenta, commonly known as taro, is a perennial herbaceous plant belonging to the Araceae family. With a cultivation history spanning thousands of years, it is not only a staple food crop in tropical and subtropical regions but also a plant with significant ecological adaptability and rich traditional utilization value. From its unique morphological structure and growth habits to its diverse applications in food, medicine, and culture, Colocasia esculenta has woven a close connection with human society.I. Growth Characteristics of Colocasia esculentaColocasia esculenta has evolved a set of growth characteristics adapted to warm and humid environments through long-term natural selection, with distinctive morphological features and environmental adaptability that lay the foundation for its wide cultivation. 1.1 Morphological CharacteristicsThe most striking feature of Colocasia esculenta is its large, ornamental foliage, which earns it the common name "elephant ears". It is a clump-forming perennial with a well-developed underground storage structure—globose or cylindrical corms that serve as the main organ for starch accumulation. The corms are thick and fleshy, rich in digestible starch, and can grow up to 15 centimeters in diameter when mature, with small lateral tubers (cormels) growing around the base, which are often used for propagation . The leaves of Colocasia esculenta grow on erect, thick petioles that can reach 1-2 meters in length, with colors ranging from green to red, black, or variegated, adding to its ornamental value. The leaf blades are heart-shaped or arrow-shaped (sagittate), with a soft velvety texture on the surface, measuring 40-60 centimeters in length and 25-30 centimeters in width. Unlike its relative Alocasia, the leaves of Colocasia esculenta face outward and downward, which helps to capture scattered light in shaded environments . The leaf veins are prominent, forming a dense network that supports the large leaf area and facilitates nutrient transport. The inflorescence of Colocasia esculenta is a typical spadix enclosed by a spathe, a characteristic feature of the Araceae family. The spathe is yellowish-white and tubular, while the spadix bears unisexual flowers—female flowers at the base, male flowers in the upper part, and sterile flowers in between. However, in cultivation, flowering is relatively rare, as the plant tends to allocate more energy to corm development rather than reproduction . 1.2 Environmental AdaptabilityColocasia esculenta is a crop native to tropical and subtropical regions, with a strong preference for warm and humid climates. It thrives in temperatures between 20-30℃, with a minimum temperature requirement of 15℃ for normal growth. It is not frost-tolerant; temperatures below 5℃ will cause leaf yellowing and wilting, while frost will directly damage the corms. In regions with cold winters (USDA hardiness zones below 9), it is usually cultivated as an annual or the corms are dug up for winter storage . In terms of soil requirements, Colocasia esculenta prefers loose, fertile, well-drained sandy loam or alluvial soil rich in organic matter, with an optimal pH range of 5.5-6.5 (slightly acidic to neutral). It has strong adaptability to soil moisture—there are both dry-cultivated varieties and wetland varieties that can grow in flooded paddy fields. However, prolonged waterlogging or drought will affect its growth: sufficient moisture promotes corm expansion, while drought may lead to stunted growth and reduced yield . Under rainfed conditions, it requires evenly distributed annual rainfall of 120-150 cm during the growth period; supplementary irrigation is necessary in case of prolonged drought . 1.3 Growth Cycle and PropagationThe growth cycle of Colocasia esculenta varies depending on the cultivation method and climate, generally ranging from 8 to 16 months. For rainfed crops, sowing is usually done in May-June, with harvest in October-November; irrigated crops can be planted year-round in suitable climates . The plant goes through four stages: germination, seedling growth, corm expansion, and maturity. During the corm expansion stage (60-90 days after planting), the plant accumulates a large amount of starch, which is the key period for yield formation. Propagation of Colocasia esculenta mainly relies on asexual methods, with lateral tubers (25-35 grams each) being the most commonly used propagation material. Approximately 37,000 tubers weighing about 1,200 kilograms are required per hectare of cultivation. The tubers are planted on ridges at a spacing of 45 centimeters, and mulching is applied after planting to retain moisture and promote germination . Sexual propagation by seeds is rarely used in production due to low germination rates and unstable offspring traits; division of clumps is another alternative propagation method, usually carried out in winter during dormancy .1.4 Nutrient and Water RequirementsColocasia esculenta has high nutrient requirements, especially for nitrogen, phosphorus, and potassium. Before planting, 12 tons of compost per hectare is recommended as basal fertilizer to improve soil fertility. After sprouting, a total of 80 kg of nitrogen, 25 kg of phosphorus, and 100 kg of potassium per hectare should be applied in two installments: half of the nitrogen and potassium, plus all the phosphorus, are applied within one week after sprouting, and the remaining nitrogen and potassium are applied one month later along with weeding and earthing up . This fertilization regime ensures vigorous foliage growth in the early stage and sufficient nutrient supply for corm expansion in the later stage. Water management follows the principle of "appropriate moisture during growth and dryness before harvest". Irrigation is carried out immediately after planting and one week later to ensure uniform sprouting; subsequent irrigation is done every 12-15 days depending on soil type. To promote starch accumulation, irrigation should be stopped 3-4 weeks before harvest. For rainfed crops, supplementary irrigation is essential during prolonged drought to prevent yield loss . II. Traditional Uses of Colocasia esculentaFor thousands of years, Colocasia esculenta has been deeply integrated into the life and culture of people in tropical and subtropical regions. Its corms, leaves, and petioles are all valuable resources, with traditional uses covering food, medicine, and even cultural rituals, reflecting the wisdom of local people in utilizing natural resources. 2.1 Food Uses: A Staple Crop with Diverse Preparation MethodsAs a staple food crop, Colocasia esculenta is valued for its high starch content and nutritional value. Its corms are rich in carbohydrates, minerals (potassium, calcium, iron), and vitamins A, B, and C, with starch digestibility as high as 98.8%, making it an ideal food for infants, the elderly, and those with digestive sensitivity . Notably, all parts of the plant contain calcium oxalate crystals, which have an acrid taste and can cause oral irritation; therefore, thorough cooking (boiling, baking, or steaming) is necessary to destroy these crystals before consumption . In different regions, Colocasia esculenta has developed unique food cultures. In Hawaii, the corms are mashed into a paste called "poi", which is a traditional staple food and plays an important role in local rituals . In the Caribbean, young leaves are cooked into a dish called "callaloo", often paired with coconut cream or seafood . In Southeast Asia, the corms are used to make taro chips, taro flour, and desserts such as taro paste buns, while the petioles are stir-fried with garlic or pickled as a side dish. In China's southern regions, taro is often boiled with glutinous rice to make festive foods, symbolizing "abundance and prosperity" . Beyond direct consumption, the corms are also processed into dehydrated products, starch, and even used as a substitute for wheat flour in gluten-free food production. Its high starch content and unique physicochemical properties make it suitable for making biodegradable plastics, laying the foundation for its modern industrial applications . 2.2 Medicinal Uses: Ethnomedicinal Wisdom Passed Down for GenerationsColocasia esculenta has a long history of medicinal use in traditional medicine systems of various regions, with almost all parts of the plant being used to treat a variety of ailments. Modern phytochemical studies have confirmed that it contains bioactive compounds such as phenolics, flavonoids, and alkaloids, which are the material basis for its medicinal effects . In Hawaiian traditional medicine, poi is used to soothe the stomach and treat diarrhea when mixed with arrowroot starch. Mashed taro leaves combined with Hawaiian salt are applied as a poultice to treat wounds and infections, while the juice of raw taro mixed with sugar is taken orally to reduce fever . The petiole juice has hemostatic properties and can be used to stop surface bleeding, and rubbing the cut petiole on insect stings can relieve swelling and pain . In the Philippines, the Pinatubo Negritos use taro to treat earaches and rheumatism—heated tubers are applied to painful joints to alleviate discomfort . In Malaysia, warmed taro leaves are used as a compress to adjust the head shape of infants with elongated skulls . In Indian traditional medicine, taro corms are used as a laxative for hemorrhoids, and honey mixed with tuber ash is applied to treat oral ulcers . These traditional remedies reflect the diverse pharmacological potential of Colocasia esculenta, which has been validated by modern studies for its antioxidant, anti-inflammatory, and antimicrobial activities . 2.3 Other Traditional Uses: Cultural and Ecological ValueBeyond food and medicine, Colocasia esculenta also has applications in culture, animal husbandry, and landscaping. In many tropical regions, it is regarded as a sacred plant—Hawaiians believe that taro is the ancestor of humans and plays a core role in religious rituals and cultural ceremonies . In some Southeast Asian communities, taro is planted around houses to ward off evil spirits, embodying people's reverence for nature.In animal husbandry, the peel of taro corms and leftover foliage are used as feed for livestock, as they are rich in fiber and nutrients . In landscaping, its large, exotic leaves make it a popular ornamental plant for patios, pondsides, and tropical gardens. Wetland varieties are particularly suitable for planting in bogs and pond edges, while potted varieties can be grown indoors as architectural plants, adding a tropical vibe to the space .Colocasia esculenta is a versatile plant that integrates food, medicine, and ornamentation, with unique growth characteristics and profound traditional value. Its strong environmental adaptability enables it to thrive in diverse climates, while its rich nutritional and medicinal components have made it a vital part of human life for thousands of years. From the staple poi in Hawaii to the medicinal poultices in Southeast Asia, from the ornamental foliage in gardens to the feed in farms, Colocasia esculenta has demonstrated extraordinary value across cultures and regions.In modern society, with the deepening of research on its phytochemical properties and industrial applications, Colocasia esculenta is no longer just an ancient traditional crop but also a promising resource for functional foods, pharmaceuticals, and biodegradable materials. Preserving and inheriting the traditional uses of Colocasia esculenta while exploring its modern value will help fully tap the potential of this crop and contribute to sustainable agriculture and human health.
-
-
December 25,2025
-
Mirabilis jalapa Care Made Easy: The Right Light, Water, and Soil
-
Mirabilis jalapa is a vibrant and rewarding plant that brings color, fragrance, and charm to gardens around the world. Famous for its trumpet-shaped blooms that open in the late afternoon, this plant is not only visually striking but also surprisingly easy to care for—once you understand its basic needs.Light Requirements: Finding the Perfect BalanceFull Sun Is Best, but Flexibility HelpsMirabilis jalapa performs best in full sun, which means at least 6–8 hours of direct sunlight per day. Adequate light encourages strong stems, abundant flowering, and vibrant colors.However, this plant is more forgiving than many flowering species. It can tolerate partial shade, especially in regions with intense afternoon heat. In such cases, morning sun combined with light afternoon shade can help prevent stress while still promoting healthy growth.Signs of Improper LightToo little light: Fewer flowers, elongated stems, and weak growthToo much harsh sun: Leaf scorching, wilting during midday heatIf you notice reduced blooming, increasing sunlight exposure is often the quickest fix.Watering Needs: Consistent but Not ExcessiveModerate Watering Is KeyMirabilis jalapa prefers evenly moist soil, but it does not tolerate waterlogged conditions. Once established, it shows moderate drought tolerance thanks to its tuberous root system, which stores moisture.A good rule of thumb is to water deeply when the top layer of soil feels dry. During hot or dry periods, watering may be needed more frequently, while cooler or rainy conditions require less.Overwatering vs. UnderwateringOverwatering can lead to root rot, yellowing leaves, and fungal diseasesUnderwatering may cause wilting, stunted growth, and reduced floweringProper drainage is essential—standing water around the roots is one of the most common reasons Mirabilis jalapa fails to thrive.Soil Preferences: Well-Draining and Nutrient-RichThe Ideal Soil TypeMirabilis jalapa grows best in loamy, well-draining soil with a slightly acidic to neutral pH (around 6.0–7.5). While it can adapt to poor soils, enriching the planting area improves overall performance.To create optimal soil conditions:Mix in organic compost to improve fertilityAdd sand or perlite if soil tends to retain waterAvoid heavy clay unless amended for drainageHealthy soil supports stronger roots, better water absorption, and more consistent flowering.Fertilizing: Less Is MoreMirabilis jalapa is not a heavy feeder. In fact, excessive fertilizer can result in lush foliage with fewer flowers.Best Fertilizing PracticesApply a balanced, slow-release fertilizer at the start of the growing seasonAlternatively, use compost or organic matter once or twice a yearAvoid high-nitrogen formulas, which promote leaf growth at the expense of bloomsIf the plant is growing well and flowering regularly, additional feeding may not be necessary.Temperature and Climate ConsiderationsMirabilis jalapa thrives in warm temperatures, ideally between 18–30°C (65–85°F). It is sensitive to frost and will die back in cold conditions.In cooler climates:Grow it as an annual, orDig up and store tuberous roots indoors over winterIn warmer regions, it can survive year-round and may even self-seed easily.Pruning and MaintenanceEncouraging More BloomsRegular maintenance helps keep the plant tidy and encourages continuous flowering:Remove spent flowers to redirect energyTrim leggy growth to maintain a compact shapeCut back the plant at the end of the growing seasonMirabilis jalapa responds well to light pruning and quickly produces new growth.Common Problems and How to Fix Them1. Yellowing LeavesOften caused by overwatering or poor drainageImprove soil conditions and reduce watering frequency2. Few or No FlowersUsually linked to insufficient sunlight or excess nitrogenIncrease sun exposure and reduce fertilization3. Pests and DiseasesGenerally pest-resistantOccasional aphids or spider mites can be managed with water sprays or mild insecticidal soapGood airflow and proper watering practices prevent most issues.Propagation TipsMirabilis jalapa can be propagated easily through:Seeds: Fast germination and high success rateTubers: Dig up and divide mature roots before replantingSeed-grown plants often flower in the same season, making this one of the easiest flowering plants to propagate.Landscaping and Garden UsesMirabilis jalapa is versatile and works well in:Cottage gardensBorders and pathwaysContainers and raised bedsIts late-afternoon blooms also attract pollinators such as moths, adding ecological value to your garden.Final ThoughtsMirabilis jalapa proves that stunning flowers don’t have to come with complicated care routines. By focusing on the right light exposure, balanced watering, and well-draining soil, you can enjoy months of colorful blooms with minimal effort.Whether planted in the ground or grown in containers, this adaptable plant rewards gardeners with beauty, fragrance, and resilience. With the tips in this guide, caring for Mirabilis jalapa truly becomes easy.
-
-
November 13,2025
-
How to Care for Euphorbia milii in Winter?
-
Euphorbia milii, a perennial succulent shrub belonging to the Euphorbiaceae family and the Euphorbia genus, is a common indoor and outdoor ornamental plant due to its vibrant, ever-blooming small flowers, unique fleshy stems, and strong adaptability. However, Euphorbia milii originates from tropical Africa and prefers warm, dry environments. It is not very cold-hardy, and improper winter care can easily lead to leaf drop, root rot, and delayed flowering.I. Temperature Control: The Core Defense Against Frost DamageThe optimal growing temperature for Crown of Thorns (Euphorbia milii) is 15-25℃. Growth slows when winter temperatures drop below 10℃, and below 5℃ it is highly susceptible to frost damage, causing leaves to yellow and fall off, and in severe cases, the entire plant to wither. Therefore, temperature control in winter is paramount.For outdoor-grown crown of thorns (Euphorbia milii), in northern regions, it needs to be moved indoors before the first frost (mid-to-late October). In southern regions, if winter temperatures occasionally drop below 5℃, protective measures are also necessary. When placing it indoors, choose a warm area such as a south-facing windowsill or balcony, away from doors, windows, and air conditioner vents where cold drafts blow directly on the plant to avoid sudden temperature drops that could shock it. If the indoor temperature is low, a simple greenhouse can be built, wrapping the plant with transparent plastic film to raise the local temperature, but be sure to leave ventilation openings to prevent stuffiness and humidity.It is worth noting that while crown of thorns needs warmth in winter, it should not be placed in excessively hot environments (such as near radiators or underfloor heating). When the temperature exceeds 25℃, the plant will prematurely break dormancy, consuming too many nutrients and affecting flowering the following year. It is recommended to maintain a stable indoor temperature of 10-15℃, which can prevent frost damage and allow the plant to enter a moderate dormancy state to accumulate energy.II. Light Management: Ample Sunlight for Guaranteed FloweringCrown of thorns is a typical sun-loving plant. In winter, the short duration and weak intensity of sunlight can cause problems such as etiolation, sparse leaves, and reduced flowering. Therefore, it's essential to provide ample sunlight in winter to meet its photosynthetic needs.When keeping it indoors, prioritize a south-facing sunny location, ensuring at least 4-6 hours of direct sunlight daily. If indoor lighting is poor, use a plant grow light, holding it 30-50cm away from the plant and running it for 6-8 hours daily to simulate natural light and promote flower bud differentiation. Note that in winter, the low angle of sunlight and window glass may block some ultraviolet rays. Regularly move the plant to a window or rotate the pot every 1-2 weeks to ensure even light exposure and prevent uneven growth.Furthermore, dry indoor air in winter, combined with insufficient light, can easily lead to mold growth. While maintaining a comfortable temperature, ensure proper ventilation by opening windows to maintain air circulation and reduce the growth of pathogens. However, avoid direct drafts of cold air when ventilating. Ventilate on a sunny day at midday when temperatures are higher, for 15-20 minutes each time.III. Water and Fertilizer Control: Better Dry Than Wet, Less Fertilizer RequiredCrown of thorns has fleshy stems that can store a large amount of water, making it extremely drought-tolerant. In winter, low temperatures and slow evaporation reduce the plant's metabolism, significantly decreasing its need for water and fertilizer. Overwatering or frequent fertilization can easily lead to root rot. Therefore, winter water and fertilizer management should follow the principle of "better dry than wet, and less fertilizer."Regarding watering, reduce the frequency and amount of watering. Water only when the potting soil is completely dry. When watering, pour slowly along the edge of the pot, avoiding direct contact with the roots and base of the stem, and prevent waterlogging. To check if the soil is dry, insert your finger or a wooden chopstick 2-3 cm into the soil. If the soil feels dry, then water. In winter, it is recommended to water on a sunny day at midday, when the water temperature is close to room temperature, avoiding cold water stimulating the roots. Furthermore, crown of thorns dislikes waterlogging; ensure the drainage holes in the pot are clear in winter. If the soil has poor aeration, place a layer of clay pebbles or gravel at the bottom of the pot to improve drainage.Regarding fertilization, the plant enters a semi-dormant state in winter, so frequent fertilization is unnecessary to avoid fertilizer burn. If the plant is growing well, apply a diluted, well-rotted liquid fertilizer or compound fertilizer once in early November to replenish nutrients and build up energy reserves for winter. After that, do not fertilize again until the temperature rises in spring (mid-to-late March). When fertilizing, pay attention to the concentration; avoid using concentrated or raw fertilizer. Water sparingly after fertilizing to help the roots absorb the nutrients.IV. Pruning and Shaping: Thinning Branches to Promote Flowering and Maintain Plant ShapeWinter is one of the best times to prune Crown of Thorns. Proper pruning reduces nutrient consumption and promotes branching, resulting in more flowers and a more aesthetically pleasing plant shape the following year. Pruning should be done when the temperature is consistently above 10℃ to avoid wounds from slow healing due to low temperatures.When pruning, first remove diseased, weak, dead, and overly dense branches to reduce nutrient waste and improve ventilation and light penetration. For excessively long, overly vigorous shoots, prune 1/3 to 1/2 to encourage lateral branch growth and a fuller plant shape. Crown of Thorns flowers mostly bloom on new shoots, so be sure to retain healthy new shoots during pruning to lay the foundation for flowering the following year.It is particularly important to note that the stems and leaves of Crown of Thorns contain a milky white sap, which is poisonous. Contact with skin can cause redness, swelling, and itching; ingestion may lead to nausea, vomiting, and other symptoms of poisoning. Wear gloves when pruning to avoid direct contact with sap, and wash tools and hands promptly after pruning. Apply carbendazim powder or wood ash to the pruning wounds to prevent infection and promote healing.V. Pest and Disease Control: Prevention First, Timely TreatmentIn winter, the enclosed and poorly ventilated indoor environment makes crown of thorns plants susceptible to pests such as scale insects and aphids, as well as diseases like root rot and leaf spot. It is essential to adhere to the principle of "prevention first, combined with control" and to effectively manage pests and diseases.Regarding pest control, scale insects and aphids are common winter pests. They suck the plant's sap, causing leaves to yellow and wither. For prevention, regularly wipe the leaves and stems with a damp cloth to remove dust and insect eggs. If a small number of insects are found, they can be manually removed or their bodies can be treated with alcohol using a cotton swab. If the infestation is severe, spray with diluted imidacloprid or dimethoate insecticides every 7-10 days, for 2-3 consecutive applications.Regarding disease control, root rot is often caused by overwatering and waterlogged soil, manifesting as root rot and wilting leaves. For prevention, the key is to control watering and keep the potting soil dry and well-draining. If root rot symptoms are found, the plant should be removed from the pot immediately, the rotten roots cut off, and the roots disinfected by soaking in a carbendazim solution. Then, replant in fresh, loose, and well-draining potting soil. Leaf spot disease manifests as brown spots on the leaves, which gradually enlarge and cause leaf drop. Prevention involves maintaining good ventilation and avoiding prolonged dampness of the leaves. After infection, fungicides such as methyl thiophanate or chlorothalonil can be sprayed to control the disease.VI. Other PrecautionsAvoid frequent moving: After the crown of thorns plant adapts to its environment in winter, it's best to avoid frequently moving the pot, as this can negatively impact growth and cause leaf drop. If moving is necessary, choose a sunny day with suitable temperature to avoid drastic temperature fluctuations.Potting soil selection: For winter care, choose loose, well-draining, slightly acidic soil. A good mix is leaf mold, garden soil, and river sand in a 2:1:1 ratio, with a small amount of well-rotted organic fertilizer added as a base fertilizer to improve soil fertility.Avoid touching: The crown of thorns has sharp thorns on its stems. During winter, avoid touching it, especially if there are children or pets in the house. Place the plant in a location where it's not easily touched to prevent injury.Spring recovery management: After winter, as temperatures rise, the crown of thorns gradually resumes growth. Gradually increase the frequency and amount of watering. Begin fertilizing in mid-to-late March to promote new shoot growth and flowering.In summary, the key to winter care for crown of thorns (Euphorbia milii) is proper temperature control, light management, water and fertilizer management, pruning and shaping, and pest and disease control. Following the plant's growth habits and creating a warm, dry, and well-lit environment is essential. With proper care, crown of thorns can not only safely overwinter but also continue to bloom, adding a touch of brightness to the cold winter days.
-
-
October 16,2025
-
How to Grow & Care for Satin Pothos Scindapsus pictus
-
With its trailing vines draped in heart-shaped leaves splashed with silvery variegation, the Satin Pothos (Scindapsus pictus) has become a favorite among houseplant lovers—especially beginners. Often mistaken for a true pothos (Epipremnum aureum), this tropical evergreen from Southeast Asia (native to countries like Thailand, Malaysia, and Indonesia) is actually a member of the Scindapsus genus. What makes it stand out? Its leaves have a soft, satiny sheen that catches light beautifully, adding a touch of elegance to shelves, hanging baskets, or mantels. Best of all, it’s low-maintenance, tolerates minor care mistakes, and thrives in typical indoor conditions—making it perfect for busy plant parents or those new to growing tropical plants. This guide will walk you through everything you need to know to keep your Satin Pothos lush, healthy, and growing strong, from light and water needs to propagation and troubleshooting common issues.1. Get to Know Your Satin Pothos: Key Varieties & Growth HabitsBefore diving into care, it’s helpful to recognize the Satin Pothos and its popular varieties—this way, you can tailor your care to its specific traits.First, distinguish it from true pothos: Satin Pothos leaves are smaller (usually 2–4 inches long) with a thinner, more delicate texture, and their variegation is silvery-gray or white, often appearing as spots, streaks, or edges (not the bright gold of Golden Pothos). Its vines grow slowly to moderately, reaching 6–10 feet long indoors with proper care, making it ideal for hanging planters or training up a moss pole (though it doesn’t cling as aggressively as pothos or philodendron).The most common Satin Pothos varieties you’ll find in nurseries or online include:Scindapsus pictus ‘Argyraeus’: The classic variety, with small heart-shaped leaves dotted with silvery spots (like someone sprinkled glitter on the foliage).Scindapsus pictus ‘Exotica’: Has larger leaves (up to 6 inches long) with bolder variegation—silvery patches cover more of the leaf surface, sometimes almost entirely masking the deep green base.Scindapsus pictus ‘Silvery Ann’: A newer variety with delicate, fine silvery streaks along the leaf veins, giving it a more subtle, elegant look than ‘Exotica’.All varieties share the same basic care needs, so once you master the fundamentals, you can grow any type successfully. Keep in mind: Satin Pothos is toxic to pets (cats and dogs) if ingested, as its leaves contain calcium oxalate crystals. Place it out of reach of curious furry friends to avoid irritation or discomfort.2. Light: The Secret to Vibrant VariegationLight is one of the most critical factors for Satin Pothos—too little, and its silvery variegation fades; too much, and its leaves scorch. The key is to find a balance of bright, indirect light—mimicking the dappled sunlight it receives under the canopy of tropical forests.Ideal Light ConditionsBest spot: Near an east- or north-facing window. East-facing windows get gentle morning sun (which won’t burn the leaves) and bright indirect light the rest of the day—perfect for encouraging strong variegation. North-facing windows provide consistent, soft indirect light year-round, though growth may slow slightly in winter.Avoid these: Direct afternoon sun (especially from west- or south-facing windows in summer). The intense heat will cause the silvery patches to turn brown or crispy, and leaves may develop sunburn spots. If your only option is a south-facing window, use a sheer curtain to filter the light—this softens the rays while still providing brightness.Low-light tolerance: Satin Pothos can survive in low light (e.g., a room with no windows but overhead lighting), but it will pay a price. Variegation will fade to plain green (the plant produces more chlorophyll to compensate for lack of light), vines will grow leggy (long gaps between leaves), and new growth will be small. If you have to keep it in low light, rotate the pot every 2–3 weeks to ensure even growth, and consider adding a grow light (set to 12–14 hours a day) to boost health.Pro tip: If you notice your Satin Pothos leaning toward the light, rotate the pot ¼ turn weekly—this keeps the plant full and balanced, with vines growing evenly in all directions.3. Watering: Avoid Root Rot (the #1 Killer)Overwatering is the most common mistake new Satin Pothos owners make. Like many tropical plants, it prefers moist but not soggy soil—its roots need oxygen to thrive, and sitting in water will cause them to rot (a fatal issue if not caught early).How to Water CorrectlyCheck first: Before watering, stick your finger 1–2 inches into the soil. If the top 1–2 inches are dry, it’s time to water. If the soil still feels damp, wait 2–3 days and check again. In winter, when growth slows, the plant needs less water—you may only need to water every 2–3 weeks (vs. every 7–10 days in summer).Water thoroughly: When it’s time to water, pour room-temperature water slowly over the soil until it drains out the bottom of the pot. This ensures the entire root ball gets hydrated (avoid just sprinkling the topsoil, which leaves roots dry). Discard any water that collects in the saucer after 30 minutes—never let the pot sit in standing water.Water quality: Use room-temperature water to avoid shocking the roots (cold water can slow growth or cause leaf drop). If you have hard tap water (high in chlorine or fluoride), let it sit in a bucket overnight before using—this allows chemicals to evaporate. Alternatively, use filtered or rainwater for the healthiest growth.Signs You’re Watering WrongOverwatering: Yellow leaves (soft and mushy, not crispy), a sour or musty smell from the soil, or wilting even though the soil is wet. If you see these signs, stop watering immediately, remove the plant from its pot, and trim any brown/soft roots (use clean, sharp scissors). Repot in fresh, well-draining soil (see Section 4) and a pot with drainage holes.Underwatering: Crispy, brown leaf edges, leaves that feel thin and papery, or vines that wilt and droop. To fix, water thoroughly and mist the leaves (see Section 5) to boost humidity—avoid giving a “sip” of water, which only hydrates the topsoil.4. Soil & Potting: Let Roots BreatheSatin Pothos needs well-draining soil to prevent root rot. A heavy, compact soil mix (like garden soil straight from the yard) will hold too much moisture, so opt for a lightweight, airy blend that drains quickly but still retains some moisture.Best Soil MixYou can buy a pre-made potting mix or make your own. Here are two great options:Store-bought shortcut: Use a commercial “indoor plant potting mix” (avoid outdoor garden soil) and add 1 part perlite or orchid bark to 3 parts mix. This adds air pockets to improve drainage.DIY mix: Combine 2 parts peat moss (or coco coir, a more sustainable alternative), 1 part perlite, and 1 part potting soil. Peat moss/coco coir retains moisture without waterlogging, perlite adds drainage, and potting soil provides nutrients.Potting TipsDrainage is non-negotiable: Always use a pot with drainage holes in the bottom. Terra cotta pots are ideal—they’re porous, so they absorb excess moisture from the soil, reducing the risk of root rot. Plastic pots work too, but be extra careful not to overwater (they hold moisture longer).Pot size: Don’t repot into a pot that’s too big. Satin Pothos likes to be “slightly root-bound”—meaning its roots fill the current pot but aren’t tightly packed. When repotting (usually every 1–2 years, in spring), choose a pot that’s 1–2 inches larger in diameter than the current one. A pot that’s too big will have too much extra soil, which stays wet longer and increases root rot risk.Repotting steps: Gently remove the plant from its old pot, loosen the root ball (tease apart any tangled roots), and place it in the new pot. Fill in around the roots with fresh soil, pressing lightly to eliminate air pockets. Water thoroughly after repotting to help the plant settle, and keep it in bright indirect light for 1–2 weeks (avoid direct sun) while it adjusts.5. Humidity & Temperature: Mimic Tropical HomesSatin Pothos hails from humid tropical forests, so it grows best in moderate to high humidity (40–60%). While it can tolerate average indoor humidity (20–30%, common in heated or air-conditioned homes), low humidity will cause issues like crispy leaf edges or slow growth.Boost Humidity EasilyMist regularly: Mist the leaves 2–3 times a week with room-temperature water. Focus on the undersides of leaves (where pores absorb moisture) and avoid misting if the room is cool or dark (this can lead to fungal spots).Pebble tray: Fill a saucer with pebbles, add water until it reaches just below the top of the pebbles, and set the pot on the pebbles. As the water evaporates, it increases humidity around the plant. Refill the tray when water evaporates.Group plants: Place your Satin Pothos near other tropical plants (like ferns, calatheas, or pothos). Plants release moisture through transpiration, creating a more humid microclimate.Humidifier: For the easiest, most consistent humidity, use a small humidifier near the plant. Set it to 40–60% and run it during dry months (winter heating or summer air conditioning).Ideal Temperature RangeSatin Pothos thrives in 65–85°F (18–29°C)—typical indoor temperatures for most homes. Avoid temperatures below 60°F (15°C): cold drafts (from windows, doors, or air conditioners) or sudden temperature drops will cause leaf yellowing, wilting, or drop. Keep it away from heat vents (dry, hot air dries out leaves) and cold windowsills (winter chill can damage roots).6. Fertilizing: Feed for Lush GrowthSatin Pothos doesn’t need much fertilizer, but regular feeding during the growing season (spring and summer) will encourage lush vines and vibrant variegation. It’s a “light feeder”—too much fertilizer will burn roots or cause leaf tip burn.Fertilizer TipsWhen to feed: Fertilize every 4–6 weeks from March to September (growing season). Stop fertilizing in fall and winter, when growth slows—fertilizer during dormancy can build up in soil and damage roots.What to use: Choose a balanced, water-soluble fertilizer for indoor plants (e.g., 10-10-10 or 20-20-20). Dilute it to half the recommended strength (e.g., if the label says 1 tsp per gallon, use ½ tsp per gallon). This reduces the risk of fertilizer burn.How to apply: Water the plant first (dry soil absorbs fertilizer too quickly, burning roots), then pour the diluted fertilizer over the soil. Avoid getting fertilizer on the leaves—if you do, wipe it off with a damp cloth to prevent leaf damage.Pro tip: If you prefer organic options, use a diluted fish emulsion or worm castings tea. These are gentle on roots and provide slow-release nutrients.7. Pruning & Propagation: Keep It Full & Share the LovePruning keeps your Satin Pothos full and prevents leggy growth, while propagation lets you create new plants (to expand your collection or give to friends). Both are easy—even for beginners.Pruning StepsWhen to prune: Prune in spring or summer (growing season), when the plant is actively growing and can recover quickly.How to prune: Use clean, sharp scissors or pruning shears to cut vines just above a leaf node (the small bump where a leaf grows from the stem). Cutting above a node encourages new growth to sprout from that point, making the plant bushier.What to prune: Trim leggy vines (long stems with few leaves), dead or yellow leaves, and any vines that are growing outside your desired shape (e.g., too long for a hanging basket). You can prune up to ⅓ of the plant at once—this won’t harm it and will stimulate new growth.Propagation: Grow New Plants from CuttingsSatin Pothos is one of the easiest plants to propagate from stem cuttings. Here’s how:Take cuttings: Cut a 4–6 inch stem from a healthy vine, making sure it has at least 2–3 leaf nodes (nodes are where roots will grow). Remove the leaves from the bottom 1–2 nodes (leave the top leaves intact—they’ll photosynthesize to feed the cutting).Root in water: Place the cutting in a glass jar filled with room-temperature water, making sure the bottom nodes are submerged (leaves should stay above water to avoid rot). Place the jar in bright indirect light, and change the water every 2–3 days to keep it clean. Roots will start to grow in 2–4 weeks.Plant in soil: Once roots are 1–2 inches long (they’ll be white and fuzzy), gently transplant the cutting into a small pot with well-draining soil (see Section 4). Water thoroughly and keep it in bright indirect light for 1–2 weeks to acclimate.Alternative: Propagate in soil: You can also plant the cutting directly in moist soil (dip the cut end in rooting hormone first to speed up growth). Cover the pot with a plastic bag (leave a small opening for air) to boost humidity, and keep the soil moist but not soggy. Roots will form in 3–4 weeks.8. Troubleshooting Common ProblemsEven with the best care, your Satin Pothos may run into issues. Here’s how to identify and fix the most common problems:Brown leaf tips: Usually caused by low humidity or underwatering. If tips are crispy and dry, boost humidity (mist, pebble tray, or humidifier) and check soil moisture more often. If tips are brown and mushy, it’s overwatering—cut back on water and ensure proper drainage.Yellow leaves: Soft, mushy yellow leaves = overwatering (fix with repotting and less water). Crispy yellow leaves = too much direct sun (move to a shadier spot).Leggy growth: Caused by low light. Move the plant to brighter indirect light, prune leggy vines, and rotate the pot weekly for even growth.Pests: Satin Pothos is relatively pest-resistant, but it can attract mealybugs (white cottony spots on leaves/stems) or spider mites (tiny red bugs, webbing on undersides of leaves). Treat with insecticidal soap or neem oil: spray the entire plant (including undersides of leaves) every 7–10 days until pests are gone.Variegation fading: Too little light. Move the plant to brighter indirect light—variegation may not return to old leaves, but new growth will be variegated again.Final ThoughtsThe Satin Pothos is a forgiving, beautiful plant that rewards even basic care with lush, silvery vines. By focusing on bright indirect light, well-draining soil, and careful watering (avoiding root rot!), you’ll keep it healthy for years. Whether you hang it in a sunny window, train it up a moss pole, or propagate it to share with friends, this tropical gem will add a touch of satin-like elegance to any indoor space. With the tips in this guide, you’re ready to grow a thriving Satin Pothos—enjoy watching its vines cascade and its variegated leaves shine!
-
-
September 05,2025
-
The Ultimate Guide to Growing and Caring for Lonicera tatarica
-
Lonicera tatarica, commonly known as Tatarian Honeysuckle, is a classic deciduous shrub that has been a staple in gardens for centuries. Prized for its incredible toughness, profuse spring blooming, and attractive berries, it can provide structure, fragrance, and wildlife value to your landscape. However, it's crucial to note that in many regions, particularly in North America, it is considered an invasive species. Its vigorous growth and bird-dispersed seeds can allow it to escape cultivation and outcompete native vegetation.A Note on InvasivenessBefore planting, please check with your local extension office or environmental agency. In many areas, it is recommended to choose native alternatives like Diervilla lonicera (Bush Honeysuckle) or Lonicera sempervirens (Coral Honeysuckle, a vine). If you do proceed, committing to responsible care (especially berry management) is essential.Planting Your Tatarian HoneysuckleGetting your shrub off to a good start is key to its long-term health.1. Choosing the Right Location:Sunlight: For the most abundant flowering, plant your honeysuckle in full sun (at least 6 hours of direct sunlight per day). It will tolerate partial shade, but blooming may be reduced.Space: Given its mature size of 10-12 feet, ensure you provide ample space for it to grow. Avoid planting too close to buildings, fences, or other shrubs unless you are committed to rigorous pruning. It can also be used effectively as a privacy screen or hedge.2. When to Plant:The best time to plant is during the shrub's dormant season.Early Spring: Plant before new growth emerges. This gives the roots a full growing season to establish.Fall: Planting after the summer heat has broken but well before the first hard freeze is also excellent. The warm soil encourages root growth without the stress of supporting top growth.3. Preparing the Soil:Tatarian Honeysuckle is famously adaptable to poor soils, but it will thrive with a little preparation.Dig a hole that is 2-3 times wider than the root ball but no deeper. The plant should sit at the same level it was in its nursery container.While it tolerates clay, if your soil is very heavy, amend the excavated soil with compost or well-rotted manure to improve drainage and provide nutrients. For sandy soil, compost helps retain moisture.4. The Planting Process:Container-Grown Shrubs: Gently remove the plant from its pot. If the roots are tightly circling (root-bound), tease them apart with your fingers or make a few shallow slices down the sides with a clean knife.Balled-and-Burlapped (B&B) Shrubs: Place the root ball in the hole and carefully remove any twine and wire. Peel back the burlap from the top third of the ball, tucking it into the hole. It's not necessary to remove all the burlap, as it will decompose.Place the plant in the center of the hole and backfill with the amended soil, firming it gently as you go to remove large air pockets.Water Thoroughly: Once planted, create a small soil berm around the edge of the root zone to form a watering basin. Soak the area deeply to settle the soil around the roots.Mulch: Apply a 2-3 inch (5-7 cm) layer of organic mulch, such as wood chips or bark, around the base of the plant. Keep the mulch a few inches away from the main stem to prevent moisture-related rot. Mulch conserves water, suppresses weeds, and regulates soil temperature.Ongoing Care and MaintenanceOnce established, Tatarian Honeysuckle is remarkably low-maintenance.1. Watering:First Year: This is the most critical period. Water deeply and regularly (about 1 inch per week) to encourage a strong, deep root system. Allow the soil to dry slightly between waterings.Established Plants: are highly drought-tolerant. They will typically only need supplemental watering during prolonged periods of extreme heat and drought.2. Fertilizing:This shrub is not a heavy feeder and often thrives without any fertilizer, especially if planted in decent soil.If growth seems slow or you want to encourage blooms, you can apply a balanced, slow-release shrub fertilizer or a layer of compost around the base in early spring, just as new growth begins. Avoid over-fertilizing, as this can promote excessive leafy growth at the expense of flowers.3. Pruning:Pruning is essential for maintaining shape, health, and bloom production.When to Prune: The best time to prune is immediately after flowering in late spring or early summer. This shrub blooms on "old wood" (growth from the previous season). Pruning later in the summer or fall will remove the next year's flower buds.Why Prune:Shape: To maintain a desired size and form.Rejuvenate: To encourage new, vigorous growth and improve air circulation.Health: To remove dead, damaged, or diseased branches.How to Prune:Use clean, sharp pruning shears or loppers.Start by removing any dead, broken, or crossing branches.To encourage new growth from the base, prune up to one-third of the oldest stems all the way down to the ground.For general shaping, make cuts just above a set of leaves or a side branch.For a formal hedge, it can tolerate shearing, but this often removes potential flowers.4. Managing Berries and Invasiveness:This is a critical part of responsible ownership.The most effective way to prevent the spread is to choose a sterile cultivar if available.If you have a berry-producing variety, you can deadhead the spent flowers before they form berries. This requires diligent effort but is the most straightforward prevention method.Regularly check the area around your shrub for seedlings and pull them up immediately.Potential Problems and SolutionsTatarian Honeysuckle is largely pest and disease-resistant but can encounter a few issues.Aphids: These small, soft-bodied insects may cluster on new growth, sucking sap and excreting a sticky substance called honeydew. They are rarely a serious threat. Blast them off with a strong jet of water or introduce beneficial insects like ladybugs.Powdery Mildew: This fungal disease appears as a white, powdery coating on leaves, often in late summer. It's usually cosmetic and not fatal. Improve air circulation through pruning and avoid overhead watering.Leaf Spot: Various fungi can cause spots on leaves. Rake up and dispose of fallen leaves in the autumn to reduce overwintering spores.Overall, the plant's vigor means most problems are minor and can be managed with good cultural practices.Is Lonicera tatarica Right for Your Garden?Lonicera tatarica is a testament to resilience. It offers a fantastic display of spring color, a lovely fragrance, and is virtually indestructible once established. It's an excellent choice for low-maintenance gardens, erosion control on difficult sites, or as a hardy hedge.However, its greatest strength—its vigorous and adaptable nature—is also its greatest weakness in non-native environments. The decision to plant it should not be taken lightly. Always prioritize native alternatives where possible. If you do choose to plant Tatarian Honeysuckle, you take on the responsibility of managing its growth and preventing its spread into natural areas. With careful and conscientious care, you can enjoy its beauty without harming your local ecosystem.
-
-
May 19,2025
-
How to make efficient compost from kitchen waste?
-
In an era where environmental consciousness and sustainable living are more crucial than ever, transforming kitchen waste into nutrient - rich compost has emerged as a practical and eco - friendly solution. Composting not only reduces the amount of organic waste sent to landfills but also enriches your garden soil, promoting healthy plant growth.Understanding the Basics of CompostingComposting is a natural biological process that involves the decomposition of organic materials by microorganisms, such as bacteria, fungi, and earthworms. These microorganisms break down the complex organic compounds in kitchen waste into simpler substances, releasing nutrients like nitrogen, phosphorus, and potassium in the process. The end product, compost, is a dark, crumbly, and earthy - smelling material often referred to as “black gold” by gardeners due to its ability to improve soil structure, retain moisture, and provide essential nutrients for plants.Gathering the Right MaterialsGreen MaterialsGreen materials are rich in nitrogen, which is essential for the growth and activity of the composting microorganisms. Common kitchen - based green materials include:Fruit and Vegetable Scraps: Peels, cores, bruised fruits, and vegetable trimmings are excellent sources of nitrogen. However, avoid adding citrus peels, onions, and garlic in large quantities as they can slow down the decomposition process due to their acidic nature and strong odors.Coffee Grounds and Tea Bags: Coffee grounds are not only a great source of nitrogen but also help to aerate the compost. Tea bags, especially those made from natural materials, can be added as well.Eggshells: Crushed eggshells provide calcium to the compost and also help to balance the pH levels. Rinse them thoroughly to remove any residual egg white to prevent odors.Brown MaterialsBrown materials are high in carbon and serve as the energy source for the composting microorganisms. They also help to improve the structure of the compost, preventing it from becoming too compact and anaerobic. Examples of brown materials from your kitchen or household include:Dried Leaves and Twigs: Collect fallen leaves and small twigs from your garden. Shred or break them into smaller pieces to speed up the decomposition process.Newspaper and Cardboard: Tear newspaper and cardboard into small strips. Avoid using glossy or coated paper as they may contain chemicals that are not suitable for composting.Paper Towels and Napkins: As long as they are not contaminated with grease or food residues, paper towels and napkins can be added to the compost pile.Other AdditivesCompost Starter or Worms: If you want to kick - start the composting process, you can add a commercial compost starter, which contains beneficial microorganisms. Alternatively, introducing earthworms to your compost bin can significantly accelerate decomposition, especially in a vermicomposting setup.Water: Maintaining the right moisture level is crucial for composting. The compost pile should be moist, similar to a damp sponge. Add water as needed during the process to ensure optimal conditions for the microorganisms.Setting Up Your Composting SystemCompost BinsThere are several types of compost bins available, each with its own advantages:Open - Pile Composting: This is the simplest method, where you pile the compost materials directly on the ground in a chosen area of your garden. It allows for easy access and turning but may attract pests and is less aesthetically pleasing.Closed - Bin Composting: These bins come in various shapes and sizes, including plastic, metal, or wooden models. Closed bins help to contain odors, keep pests out, and can be more visually appealing. Some models also have built - in aeration systems to promote better decomposition.Vermicomposting Bins: Specifically designed for worm composting, these bins use earthworms to break down the organic materials. Vermicomposting is ideal for smaller households and produces a high - quality, nutrient - rich compost known as vermicompost.LocationChoose a location for your compost bin that is well - ventilated, partially shaded, and close to a water source. Avoid placing it near windows or doors to prevent odors from entering your home. If you live in an apartment or have limited outdoor space, consider using a small indoor compost bin or a balcony - friendly model.The Composting ProcessLayering the MaterialsStart by placing a layer of brown materials at the bottom of the compost bin to provide good aeration. This layer also helps to prevent the compost from becoming waterlogged. Then, add a layer of green materials on top. Aim for a ratio of about 3 parts brown materials to 1 part green materials. This carbon - to - nitrogen (C:N) ratio is crucial for efficient decomposition. If the ratio is too high in carbon, the composting process will be slow; if it’s too high in nitrogen, the pile may become smelly and anaerobic.Building the PileContinue layering the brown and green materials, alternating between the two. As you build the pile, try to keep it as uniform as possible. Each layer should be about 4 - 6 inches thick. If you have larger items, such as whole fruits or thick branches, break them into smaller pieces before adding them to the pile.Maintaining the PileMoisture: Check the moisture level of the compost pile regularly. Insert your hand into the pile; if it feels dry, add water. If it feels too wet, add more brown materials to absorb the excess moisture.Aeration: Turn the compost pile every 1 - 2 weeks using a pitchfork or a compost turner. Aeration helps to supply oxygen to the microorganisms, which is essential for aerobic decomposition. It also helps to speed up the process and prevent odors.Temperature: A healthy compost pile will generate heat as the microorganisms break down the organic materials. The temperature inside the pile can reach 130 - 160°F (54 - 71°C) during the active decomposition phase. Monitor the temperature with a compost thermometer. If the temperature drops too low, it may indicate that the pile is too wet, too dry, or lacks sufficient aeration.Signs of Compost ReadinessAfter several weeks to several months, depending on the size of the pile, the materials, and the environmental conditions, your compost will be ready to use. Look for the following signs:Appearance: The compost should be dark brown or black, crumbly, and have an earthy smell. The original materials should no longer be recognizable.Temperature: The compost pile should have cooled down to near ambient temperature, indicating that the decomposition process has slowed down.Texture: It should feel like a rich, moist soil. If there are still large pieces of un - decomposed materials, you may need to continue the composting process or sift them out.Using Your CompostOnce your compost is ready, it can be used in a variety of ways in your garden:Soil Amendment: Incorporate the compost into your garden beds at a rate of about 2 - 3 inches deep. This will improve the soil structure, increase its water - holding capacity, and provide essential nutrients for your plants.Top Dressing: Spread a thin layer of compost on the surface of your flower beds, vegetable gardens, or around shrubs and trees. This helps to suppress weeds, retain moisture, and gradually release nutrients into the soil.Potting Mix: Mix compost with peat moss, perlite, and vermiculite to create a nutrient - rich potting mix for your potted plants.Troubleshooting Common Composting ProblemsOdors: If your compost pile smells bad, it may be too wet or lacking in oxygen. Add more brown materials, turn the pile more frequently, and make sure there is enough aeration. Avoid adding materials that are high in fats, oils, or meat, as they can cause unpleasant odors.Pests: Insects, rodents, and other pests may be attracted to your compost pile. To deter them, keep the pile moist but not wet, cover it with a layer of brown materials, and avoid adding food scraps that are likely to attract pests, such as meat, dairy products, and oily foods.Slow Decomposition: If the composting process is taking too long, check the C:N ratio, moisture level, and aeration. Add more green materials if the ratio is too high in carbon, adjust the moisture as needed, and turn the pile more frequently to improve aeration.By following these steps and tips, you can effectively transform your kitchen waste into high - efficiency compost, contributing to a more sustainable lifestyle while nurturing your garden. Composting is not only a practical gardening technique but also a rewarding way to reduce your environmental footprint and make a positive impact on the planet.
Show More
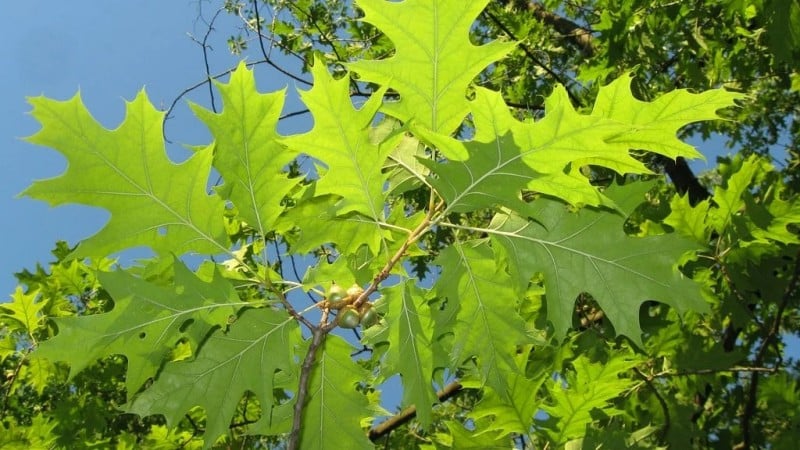
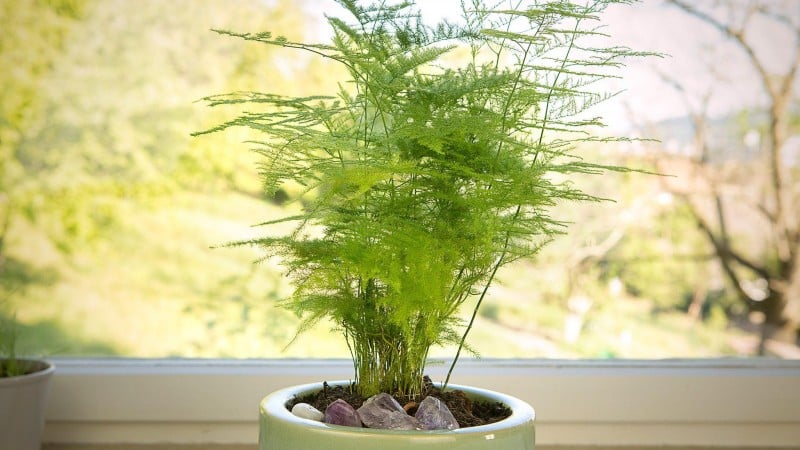

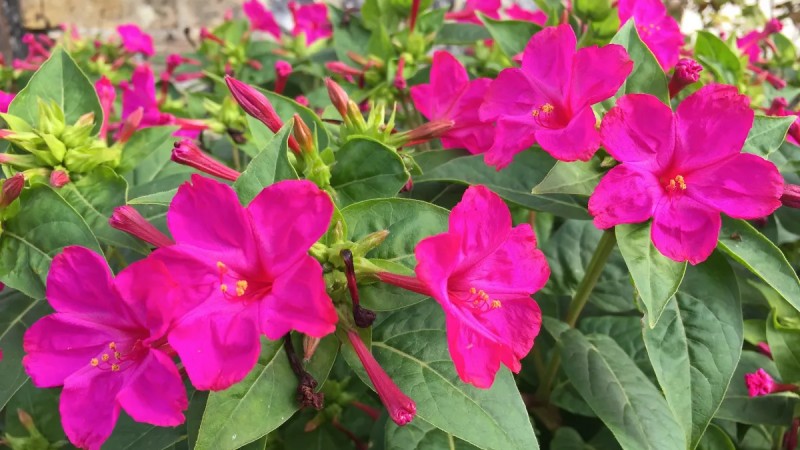
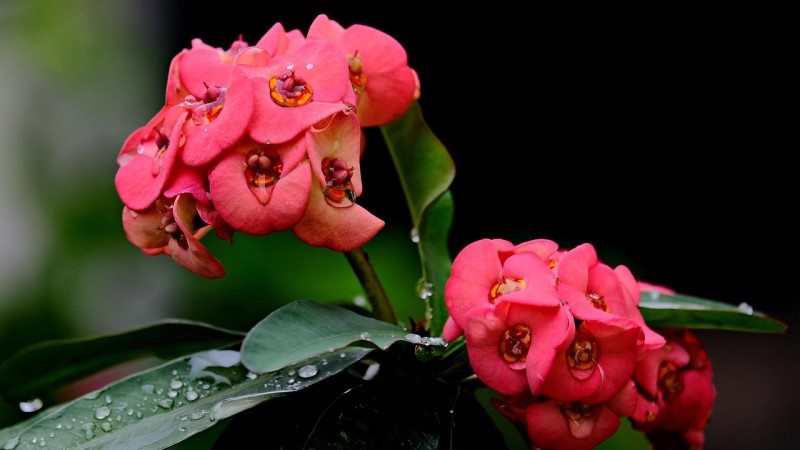
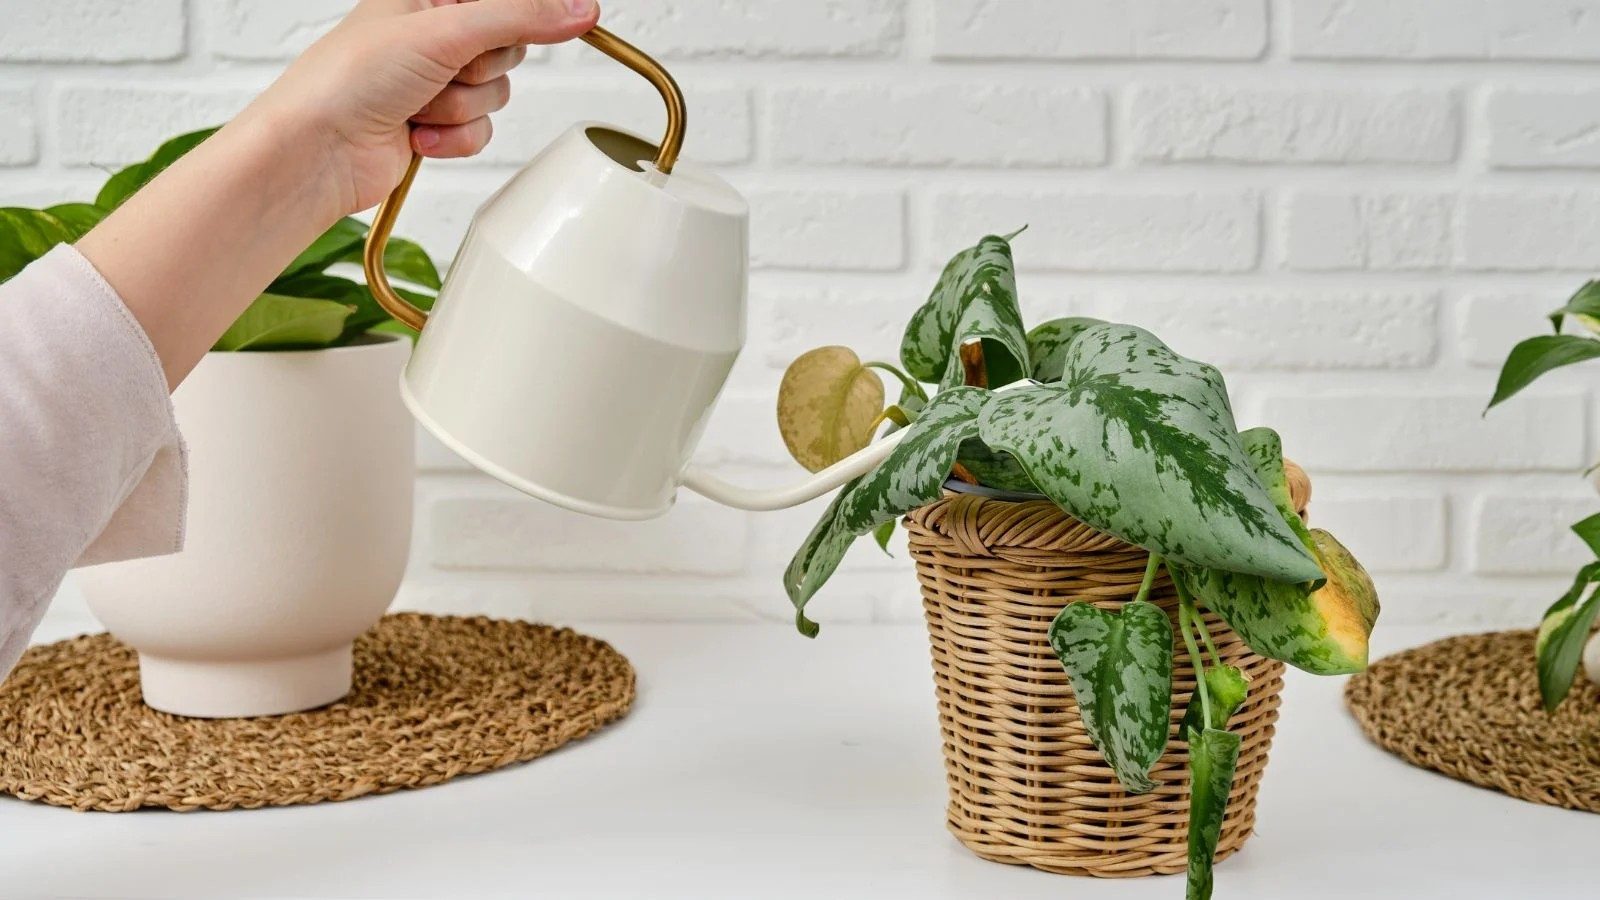
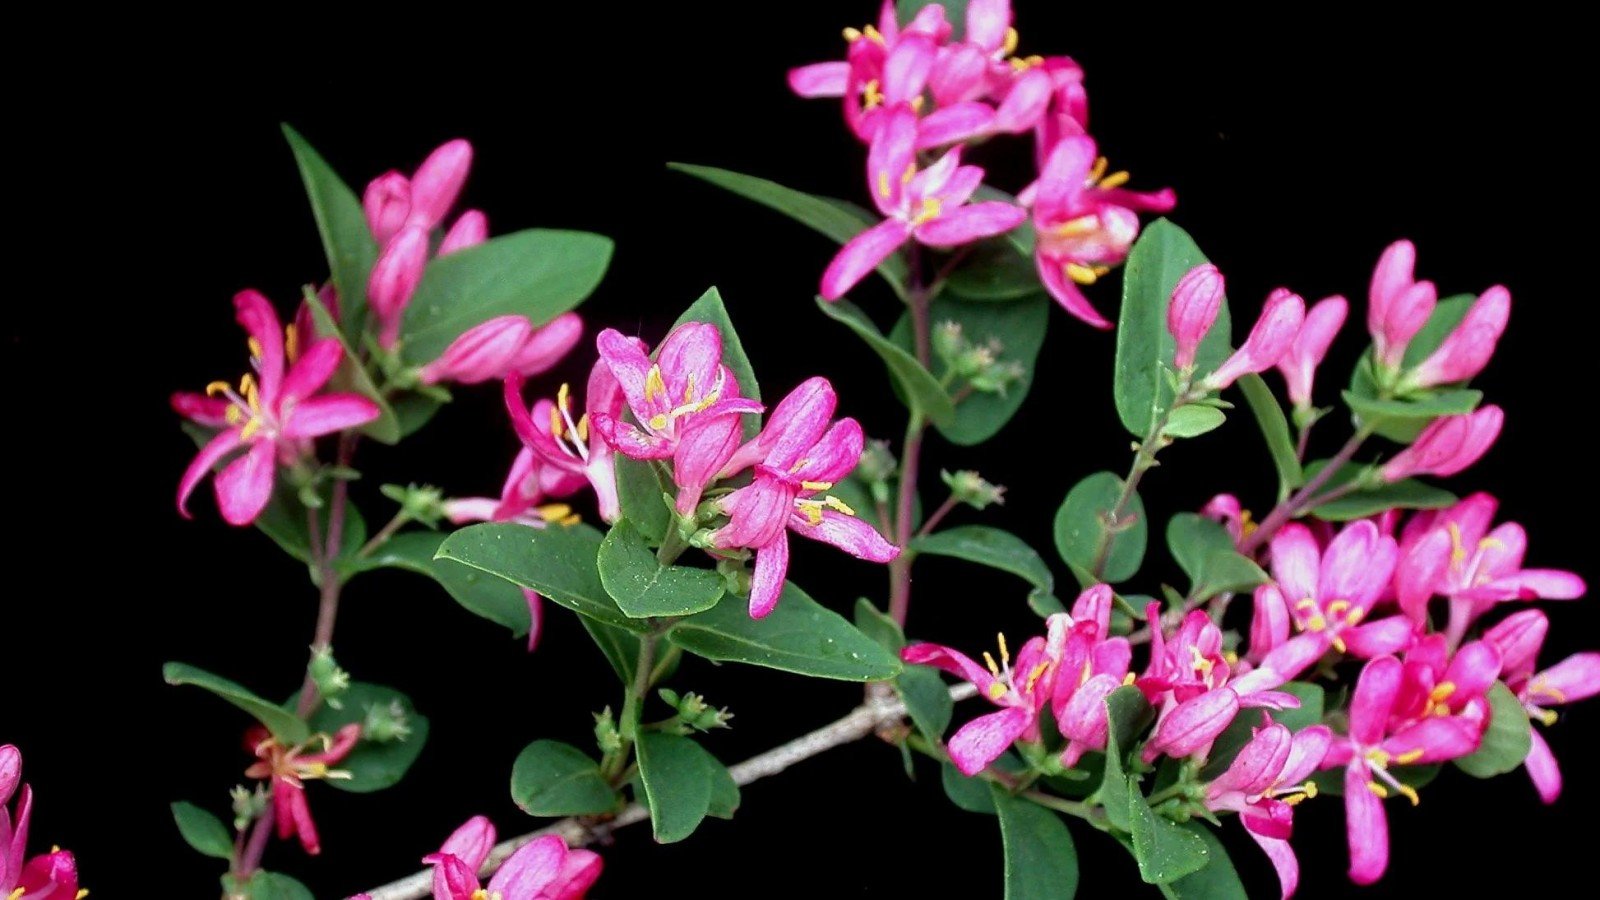
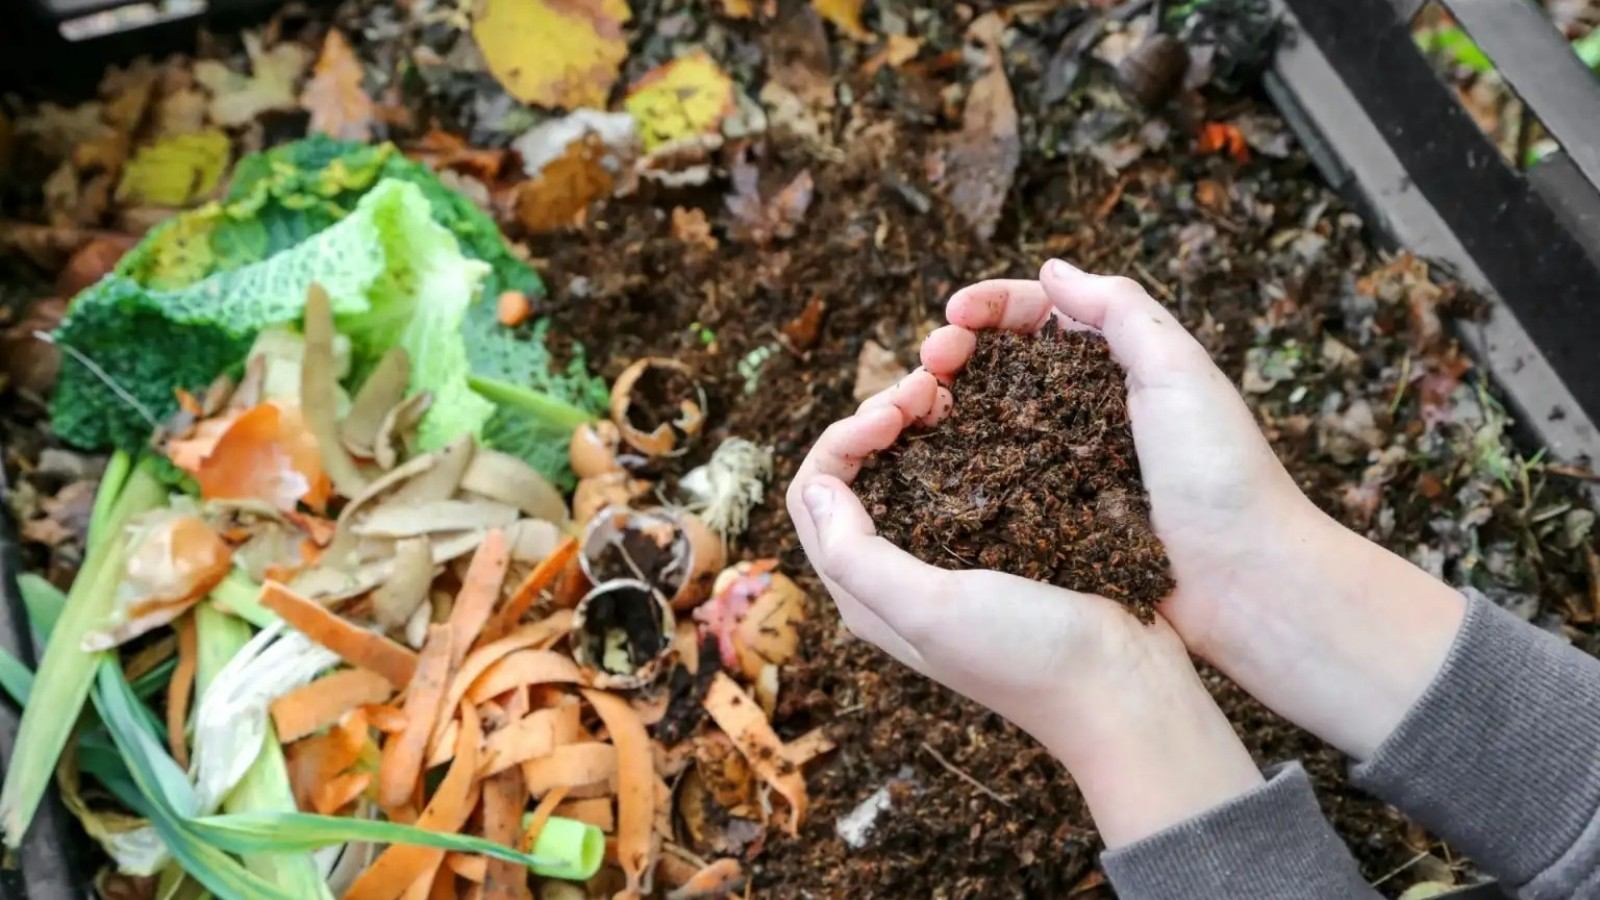
 Poisonous and danger
 Wild and common weed
 Edible and medicinal